Right then, time for the details of the SSD upgrade...
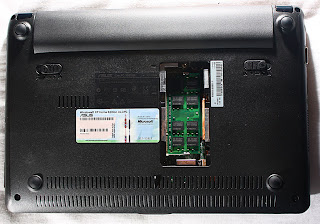
- First remove the battery - slide the right slider to the right to unlock the battery. Slide the left slider to the left and at the same time slide the battery away from the laptop and it should be removed.
- Second step, unscrew the 4 screws in each corner on the underside of the EeePC. You can see these in the picture on the left.
- Next, take off the RAM cover (described in the RAM post). In the bottom right hand corner of the RAM hole there is a silver screw which needs to be undone (this can also be seen in the picture on the left).
- In the area where the battery was there are 4 little clips on the side of the main body of the laptop. Using a little screwdriver or something you can carefully pull these out and you should be able to feel when they are released.
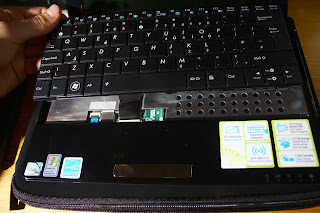
- Now flip the laptop over and open the lid. The next step is to remove the keyboard. There are 4 little clips along the top edge of the keyboard which are evenly spaced along (I can't remember which keys they are behind). If you press the keys down (the F keys along the top) you should be able to see where these clips are. Using the small screwdriver press these clips back towards the battery slot. As you press these in you might feel the keyboard lifting up. There was some double-sided tape approximately underneath the backspace on this EeePC but I think this may be in different places on different ones. Once I could get my fingers underneath the keyboard I carefully prised it upwards, working along towards the double-sided tape and then I could hear it slowly releasing. Once the double-sided tape was off I could pull the keyboard off (it hinges at the bottom), but carefully as the ribbon was still attached!
- In the picture on the left you can see that I have released the keyboard but the ribbon is attached. If you look at the connector for the ribbon there are 2 little black bits either side. Using the small screwdriver slide these backwards and they pull a little tray out that the ribbon sits in. Now you should have the keyboard free of the netbook.
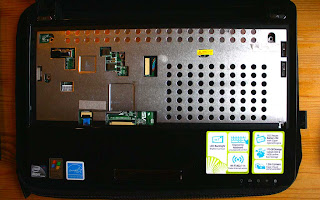
- Next step is to remove the screws that are underneath the keyboard. There are 6 screws under the keyboard - 2 top left, top and bottom right, one left of middle and one right of middle underneath the warranty sticker.
- You can see where the screws were in the photo on the left. I think some people have managed to save their warranty stickers but I wasn't lucky with mine, I tried to take it off carefully but that didn't work, I tried heating it up with a hair dryer but that didn't work and ended up breaking it as I needed to get to the screw to do the upgrade.
- Now the screws are out the top and bottom are nearly free, save a few clips around the outside. If you slide your fingernail around the outside of the netbook you can feel it parting at you can click the clips apart (they shouldn't break, just pop open). I got most of the way round but got stuck at the bit in the middle by the touchpad buttons and just couldn't prise it apart. After some head-scratching I used a credit card to open it up and ran it around the outside of the EeePC and then all of the clips popped open and the top and bottom were free. Don't rip it off though as they are still connected by the touchpad ribbon!
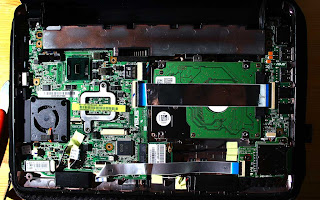
- In the picture on the left there is the HDD under the silver strip, but the point of the picture is showing me holding up the top half of the laptop but it is still attached by the touchpad ribbon - towards the left of the picture, with a blue bit at the end. To release the ribbon lift the black bit on the top of the connector (with the small screwdriver) and then you can pull on the blue bit and the ribbon comes out. Now the top and bottom are actually apart and you are inside the 1005HA!
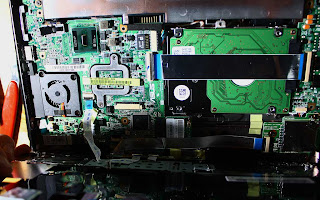
- This picture is a bit clearer showing the innards of the EeePC. Most of this doesn't matter except the HDD on the right of the netbook underneath a silver strip. This strip acts as a heat-sink for the hard drive and a connector ribbon for the USB ports to the motherboard. This needs to be removed to get access to the HDD. To remove the ribbon lift the black bits on the top of the connectors on both sides as with the touchpad ribbon. Now the HDD is uncovered.
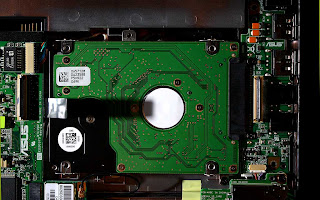
- This is what you see now (I apologize for the shadow on the left, it is from a flash!). The connector for the HDD - the SATA interface - is on the right, just inside the right hand heat-sink ribbon connector. There are 2 black screws just to the right of this that need to be removed, once they are out there is one more screw to take out at the bottom right corner of the HDD (just to the left of where it says "Card Reader" on a different chip. Now these 3 screws are out the HDD is free.
- To take the HDD out you need to slide the HDD left-wards to slide it out of its SATA connector. You can pull it out with the silvery tab (which is causing the shadow in my photo) and once it is out the HDD can be lifted out.
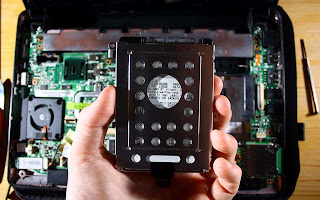
- In the photo on the left I am holding up the HDD having just removed it. As you can see it is in a cage (which also acts as a heat-sink). There are 4 screws holding the HDD in the cage, 2 on each side. These need to be taken out and then the HDD lifts out of the cage.
- Next step is to put the the SSD in the cage. Make sure it is put in in the same orientation as the HDD that was take out!!
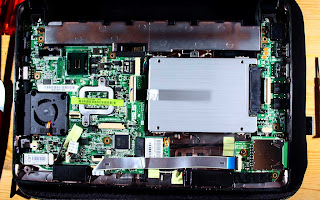
- The photo on the left shows the SSD installed in the EeePC. It was screwed into the cage then dropped into the space where the old HDD came from. I then pushed it right-wards into the SATA connector. Then replaced the 3 screws that hold the cage down (2 by the connector and 1 bottom-right).
- The next step is to do everything that was done to take it apart in reverse and put the EeePC back together! So get the top panel, put the touchpad ribbon back in its connector and press the black tab back down onto it and then press the whole top down into the clips so it is flush with the bottom. Screw the 6 under-keyboard screws in and then replace the keyboard ribbon followed by the keyboard. Put the keyboard in at the bottom then press it into the clips at the top so it is sitting down securely. Close the lid and flip the laptop over, replace the screw in the RAM slot and put the RAM cover on. Put the 4 screws in the corners back in and replace the battery, locking it in with the sliders. All back in and ready to boot up for the first time and reinstall the OS and software.
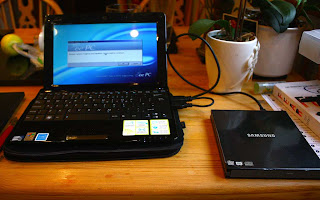
- Now as the EeePC 1005HA does not have a built-in DVD drive an external one is required to reinstall the OS. In the picture on the left you can my external DVD drive plugged in. I put the Eee recovery DVD in and started up the EeePC. It then asks you if you want to reinstall everything or something like that. Just click yes and follow through the steps and this installs everything onto the SSD so it is as the HDD comes out of the box. Once the recovery process if finished your EeePC is fully upgraded and ready to go.
Very exciting and relatively painless process to upgrade the HDD to an SSD if you follow these steps. I think I have covered everything, I'm just writing this off the top of my head but I am pretty sure I have written everything that I did.
I haven't yet done any official accurate timings of speed but the netbook is noticeably quicker - e.g. less than 30 seconds for a full restart (from on to off and to back on again and ready to use). Everything opens pretty much instantly which is great - I'm extremely pleased with it (in case you can't tell!) The other very noticeable thing is that the EeePC with SSD is silent to use unless it gets hot and the fan comes on.
I hope you find this guide helpful to upgrade your EeePC 1005HA. AJ
Very nice.
ReplyDeleteExcellent job! I feel as if not enough people are giving this step-by-step as much attention as it deserves. Anyway, kudos!
ReplyDeleteYes, great job! It seems unusual that you had to first remove the back. Are those screws holding the front of the case, or do you think you can get at the hard drive by just going in through the top, i.e. removing the keyboard and top housing?
ReplyDeleteFred: Those screws on the underside screw into the top housing so they have to be undone, the bottom of the case does not come off.
ReplyDeleteGlad you appreciate it!
Thanks for your hard work - this is a fantastic guide - Much appreciated!
ReplyDeleteVery nice guide!
ReplyDeleteAre you thinking og trying to install a 3g modem, would be cool with a guide for that.
Great work! I would have liked to see official data differences between the original device and after the modifications (timings, power consumptions...). Can you give us that?
ReplyDeleteI followed your guide to change from 160 to 500 GB HDD. Very good - my pc still works, dual booting Win XP/Ubuntu Karmic 9.10 Beta.
ReplyDelete@speyer: no plans to install a 3g modem and it isn't easy. I think it is possible to swap the bluetooth for a 3g module. Sorry I can't help.
ReplyDelete@Anonymous re: data differences - I mentioned a bit about differences in my SSD post so have a look at that. Other than that I don't think there is much else that I can help.
Glad I have helped, feel free to ask any other questions and I will do what I can to help.
worked great, thx!
ReplyDeleteHad to upgrade hard drive on my new Asus EeePc 1201HAB from 160 to 500gb. It looks like 1005HA is similar in design with 1201. Without your help I would definitely screw up with my laptop. Thank You very much...
ReplyDeleteThe 1TB 2.5" hard drive is 12mm thick, rather than the regular 9mm thickness of the drive the 1005HA came with.
ReplyDeleteI have a 500GB drive that I want to install in my brand new - never turned ON - 1005HA, but from your experience, would you say there is some gap after replacng the original drive??? like 3mm :-)
Great job of detailing the process. I will floow that either for the 500GB 9mm or the 1TB 12mm
Thanks so much, this really saved my butt.
ReplyDeleteRE the hard drives - I'm not sure if there is quite 3mm space left, there is a bit. If you have the 1TB drive already why don't you try it and let me know while you are doing the 500GB one. I don't have a chance to take mine apart and measure the space at the moment, sorry! AJ
ReplyDeleteThanks very much for that nice article. It helped me replace my 160GB hard drive in my 1005HA with an intel postville 80GB. I especially liked the credit card trick and the info about the mini connectors that needed to be lifted up. I was trying to pull them without success.
ReplyDeleteNow I can get reach the login prompt in about 12 seconds from power up, and a find on the disk scans about 15000 files per second, that's really awsome.
That makes a great portable development platform !
Thanks again for the images. They sure helped, especially with removing the keyboard without damaging the reflective surface (I hate it).
ReplyDeleteThe 1TB 2.5" drive will not fit! Its 12.5mm thickness is really a killer and I believe the product was released out to the market to make a point rather to be practical for Notebooks or Netbooks.
I replaced the original 160GB witha WD 500GB 7200RPM drive which proven to be a life saver for me as an IT professional compared with the 5400RPM.
Again, thanks for the info.
Well, here is an update:
ReplyDeleteThe Asus does not recognize the 500GB 7200RPM SATA drive I installed... It does show up in the BIOS but only once when I check the Boot order. I can see the model, so I know it is there and was installed correctly.
The Asus will not boot into the drive even though it came from another Asus and packed with software. When I connected an external CD drive and tried to boot from the Windows XP Pro SP3 original CD, I was told that there is no hard drive connected to this computer.... I wonder if the 500GB 7200RPM draws more current than the Asus can provide at that connector.... and maybe it does not spin...
I don't know, so right now I have a disabled Asus....
Nice and awesome work mate, I love it.
ReplyDeleteI myself just got a 1005HA 250Gb HDD, 1Gb ram, and windows 7 starter, and I was wondering what kind of SSD's would fit in it, is it some special kinds? Or is it just the same as those fitted to desktop PC's?
Thanks
TripleD
@TripleD: It needs to be a 2.5" drive. Those fitted in desktop PCs are 3.5" so won't fit, which means you need to check before ordering.
ReplyDelete@arej: Okay I will make sure to get the correct 2.5" But when I search for 2.5" SSD's I get these choices: 2.5", 2.5"Slimline, 2.5"SFF, 2.5"x1/8H. is it just the slimline I should go for? or the "regular" 2.5"?
ReplyDeleteCheeRS and thanks
TripleD
Thanks so much for the writeup! I spilled some water into my keyboard, right over the HDD. With this info, I was able to pull it apart to air it out thoroughly.
ReplyDeletedude u made my life so much easier thanks so much
ReplyDeleteThks for the guide, just upgraded mine!
ReplyDeleteBTW, im having a problem with my keyboard,
it started typing the "F1" non-stop & i couldnt use my letter Y.
Should i change my keyboard or the ribbon?
Help me pls.
@kthalejo: Sorry I have been slow to reply - not been watching recently. It doesn't sound that good, have you made sure that the keyboard is fully pressed down etc? It might be that you need a new keyboard, not sure you can just change the ribbon.
ReplyDelete@TripleD: Again sorry for the slow reply - have you already chosen? Regular 2.5" should be fine I think but the slimline would do no harm. AJ
Really thanks !! I 've thought about upgrading my disk to SSD
ReplyDeleteTerje , Norway
@arej, yeah i made sure the keyboard is fully pressed down...i already ordered 1 set of keyboard & ribbon for the replacement.
ReplyDeleteBtw man, good job really helped a lot.
Keith
Manila,Philippines
hi, thanks a lot. I followed your guide to change from 160 to 500 GB HDD. Very good - my Laptop still works, dual booting Win XP/Ubuntu Karmic 9.10 Beta.
ReplyDeleteThanks for this. Gonna give it a try on my 1001P (same form factor).
ReplyDelete@arj
ReplyDeleteThanks! In a couple of seconds, I'm clicking the final ok to buy a Corsair Nova SSD 128 GB :)...
Erik
Denmark
Wow, super helpful. I bought some RAM and have been meaning to install it, but I didn't want to pay to have it done. I followed this guide, and I'm set. Thank you!
ReplyDeleteThanks for this! I went from 250GB to 320GB. Normally, I would have it done by a pro, but I was tight on money and short of time. Your guide was really helpful. Thanks again.
ReplyDeleteGood lord! I don't think I ever would have figured this out myself, what with all the seemingly hidden clips. Thank you very much for taking the time to create an post such an excellent and useful tutorial!
ReplyDeleteThanks, this helped with my 1000H.
ReplyDeleteDoes any one have the pin out battery for asus eee pc 1005 ha? My power adaptor is working fine but the netbook battery wont charged and I cannot turn on in with using just the power adaptor, it seems like some how I fried the power module of the netbook. I took it to service center and they say they need to replace the whole board, and that will cost half of the new netbook.
ReplyDeleteGreat guide thank you. UPgraded the hard drive in my 1005ha to a Scorpio Black 750GB 7200RPM. No heat issues at all and it is a lot faster!
ReplyDeleteMy only suggestion on the guide would be to give more information on techniques on how to secure the keyboard again.
I would like info on pinout of the battery prongs attached to the back of the 1005HA series. My diodes are fried on mainboard, so wont charge with AC unit. I know its a 9 pin configuration, but nothing more. Any info is greatly accepted.
ReplyDeleteThank you! It worked exactly as you said. I kept my old OS by making a WIM image of the old HDD and then applying the WIM to the new SDD. All my old settings and data back -- just faster now!
ReplyDeleteTHANK YOU! This really, really, really helped!! :)
ReplyDeleteFollowed guide which was very helpful but now my 1005P does not work! It comes on for a few seconds, a few lights, nothing on screen, then turns off. One time I got a normal startup screen but then all went off before getting to the Win7 loading screen.
ReplyDeleteI've stripped it down again and retraced my steps making sure all connections ok. Interesting that without the keyboard and touchpad connected it does the same - have I 'broken' one of the cables?
Is the little black coated wire in front of the HD the wifi antenna? I might have moved this but it looks intact...
What type of internal hhd can I use with Asus EeePc 1005HA B12, I want to upgrade to a 250GB?
ReplyDeleteThanks and very nice write up :)
Well, I thought I'd give a quick update . . . my second upgrade now, up'd the HD to Samsung Spinpoint 1TB HNM101MBB from Seagate Momentus 500GB ST9500325AS from a Seagate Momentus 160GB ST916031AS (just mirrored drives with Acornis True Image Home, also up'd RAM to 2GB and added Mini v2.0 USB Bluetooth Adapter for BT MS Mouse 5.0 [1st upgrade]. Thanks for the DETAILED instructions, everything is 5x5, hot straight and normal, been running 3 Days straight CPU temp 39°C and HD temp 38°C. I've had this Asus Eee 1005HA running constantly ON for (3) three years, as I use it to seed
ReplyDeletemy torrents. MaStMaN
Excellent! This is just what i need. Thank you for your hard work explaining this step by step!
ReplyDeleteI've just upgraded the hd with a new 128Gb ssd and it is now a pleasure to use the eee pc for internet and Office. Everything opens quickly. I planned to buy a new laptop but I now think I'll keep this one for a while. Thanks!
ReplyDeleteSplendid! My wifes EEE don't need a change for years!
ReplyDeleteJan from Norway
I have replaced my HD with an Intel SSD... but the recover CD can not find the hard drive. I placed the SSD in an XP machine and partitioned & formatted the drive... but still no luck. I think I've also tried every combination of HD config in the eee PC BIOS. (1005HA eee PC).... ?? Dave
ReplyDeleteyour upgrade procedures are well taken up.Can it also work out on missing or deleted storage device(c)on Eeepc r105d. To follow the same steps,taking out SSD and put it back the same ssd drive.will it bring back the drive requires for storing data to recover the system?
ReplyDeleteThanks a lot for the instructions. They worked very well!
ReplyDeleteThanks for this, it helped a lot.
ReplyDeleteGreat help! Thank you very much!!
ReplyDeleteHey, thanks a lot for sharing. I've just upgraded the disk of my EEEPc because the original drive was starting to fail (after I dropped the laptop a couple of times). I prefer to read a good article like this than to watch a 5 minutes video. Again, thanks for taking the time to write it and for sharing it.
ReplyDeleteRegards, MV
Excellent work! Thanks for posting.
ReplyDeleteA tip I picked up from other Asus users is to use a bass pick for the difficult clips holding the keyboard tray. I used a pick I had lying around but I think you can buy them for a dollar or two. -(signed, different anonymous person from above)
I would like to thank you for the efforts you have made in writing this article. I am hoping the same best work from you in the future as well. In fact your creative writing abilities has inspired me to start my own BlogEngine blog now. Really the blogging is spreading its wings rapidly. Your write up is a fine example of it. q551ln-bbi706
ReplyDeleteThat instruction is magnifico. Thank you all.
ReplyDeleteHi, from your experience, without a hard drive but with RAM installed, if there's no power at all (netbook doesn't turn on, no power to USB either), it's the CMOS battery dead?
ReplyDelete