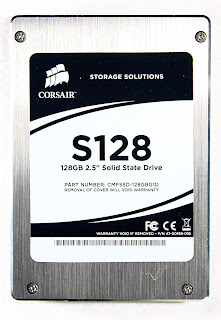
Right then, time for the details of the SSD upgrade...
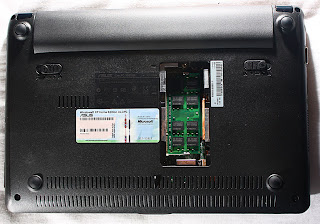
- First remove the battery - slide the right slider to the right to unlock the battery. Slide the left slider to the left and at the same time slide the battery away from the laptop and it should be removed.
- Second step, unscrew the 4 screws in each corner on the underside of the EeePC. You can see these in the picture on the left.
- Next, take off the RAM cover (described in the RAM post). In the bottom right hand corner of the RAM hole there is a silver screw which needs to be undone (this can also be seen in the picture on the left).
- In the area where the battery was there are 4 little clips on the side of the main body of the laptop. Using a little screwdriver or something you can carefully pull these out and you should be able to feel when they are released.
- Now flip the laptop over and open the lid. The next step is to remove the keyboard. There are 4 little clips along the top edge of the keyboard which are evenly spaced along (I can't remember which keys they are behind). If you press the keys down (the F keys along the top) you should be able to see where these clips are. Using the small screwdriver press these clips back towards the battery slot. As you press these in you might feel the keyboard lifting up. There was some double-sided tape approximately underneath the backspace on this EeePC but I think this may be in different places on different ones. Once I could get my fingers underneath the keyboard I carefully prised it upwards, working along towards the double-sided tape and then I could hear it slowly releasing. Once the double-sided tape was off I could pull the keyboard off (it hinges at the bottom), but carefully as the ribbon was still attached!
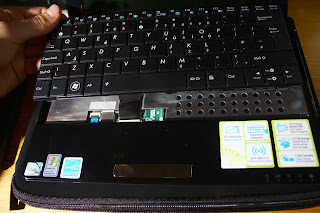
- In the picture on the left you can see that I have released the keyboard but the ribbon is attached. If you look at the connector for the ribbon there are 2 little black bits either side. Using the small screwdriver slide these backwards and they pull a little tray out that the ribbon sits in. Now you should have the keyboard free of the netbook.
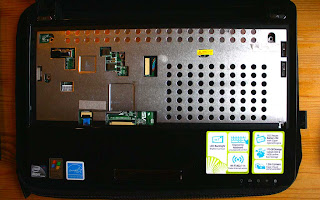
- Next step is to remove the screws that are underneath the keyboard. There are 6 screws under the keyboard - 2 top left, top and bottom right, one left of middle and one right of middle underneath the warranty sticker.
- You can see where the screws were in the photo on the left. I think some people have managed to save their warranty stickers but I wasn't lucky with mine, I tried to take it off carefully but that didn't work, I tried heating it up with a hair dryer but that didn't work and ended up breaking it as I needed to get to the screw to do the upgrade.
- Now the screws are out the top and bottom are nearly free, save a few clips around the outside. If you slide your fingernail around the outside of the netbook you can feel it parting at you can click the clips apart (they shouldn't break, just pop open). I got most of the way round but got stuck at the bit in the middle by the touchpad buttons and just couldn't prise it apart. After some head-scratching I used a credit card to open it up and ran it around the outside of the EeePC and then all of the clips popped open and the top and bottom were free. Don't rip it off though as they are still connected by the touchpad ribbon!
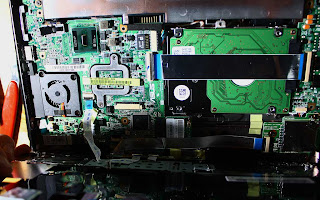
- In the picture on the left there is the HDD under the silver strip, but the point of the picture is showing me holding up the top half of the laptop but it is still attached by the touchpad ribbon - towards the left of the picture, with a blue bit at the end. To release the ribbon lift the black bit on the top of the connector (with the small screwdriver) and then you can pull on the blue bit and the ribbon comes out. Now the top and bottom are actually apart and you are inside the 1005HA!
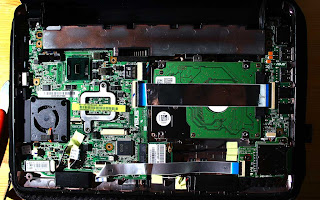
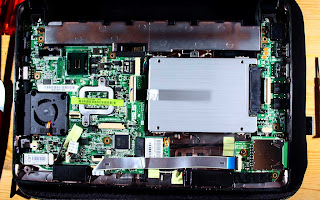
- This picture is a bit clearer showing the innards of the EeePC. Most of this doesn't matter except the HDD on the right of the netbook underneath a silver strip. This strip acts as a heat-sink for the hard drive and a connector ribbon for the USB ports to the motherboard. This needs to be removed to get access to the HDD. To remove the ribbon lift the black bits on the top of the connectors on both sides as with the touchpad ribbon. Now the HDD is uncovered.
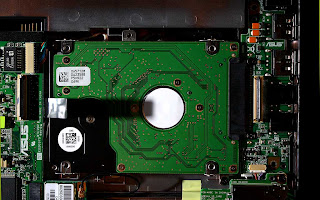
- This is what you see now (I apologize for the shadow on the left, it is from a flash!). The connector for the HDD - the SATA interface - is on the right, just inside the right hand heat-sink ribbon connector. There are 2 black screws just to the right of this that need to be removed, once they are out there is one more screw to take out at the bottom right corner of the HDD (just to the left of where it says "Card Reader" on a different chip. Now these 3 screws are out the HDD is free.
- To take the HDD out you need to slide the HDD left-wards to slide it out of its SATA connector. You can pull it out with the silvery tab (which is causing the shadow in my photo) and once it is out the HDD can be lifted out.
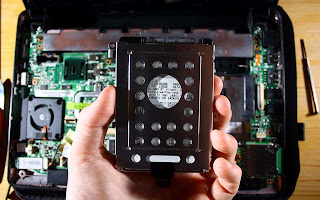
- In the photo on the left I am holding up the HDD having just removed it. As you can see it is in a cage (which also acts as a heat-sink). There are 4 screws holding the HDD in the cage, 2 on each side. These need to be taken out and then the HDD lifts out of the cage.
- Next step is to put the the SSD in the cage. Make sure it is put in in the same orientation as the HDD that was take out!!
- The photo on the left shows the SSD installed in the EeePC. It was screwed into the cage then dropped into the space where the old HDD came from. I then pushed it right-wards into the SATA connector. Then replaced the 3 screws that hold the cage down (2 by the connector and 1 bottom-right).
- The next step is to do everything that was done to take it apart in reverse and put the EeePC back together! So get the top panel, put the touchpad ribbon back in its connector and press the black tab back down onto it and then press the whole top down into the clips so it is flush with the bottom. Screw the 6 under-keyboard screws in and then replace the keyboard ribbon followed by the keyboard. Put the keyboard in at the bottom then press it into the clips at the top so it is sitting down securely. Close the lid and flip the laptop over, replace the screw in the RAM slot and put the RAM cover on. Put the 4 screws in the corners back in and replace the battery, locking it in with the sliders. All back in and ready to boot up for the first time and reinstall the OS and software.
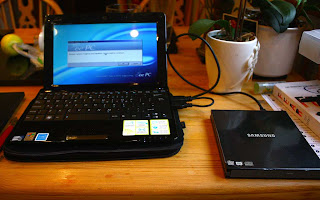
- Now as the EeePC 1005HA does not have a built-in DVD drive an external one is required to reinstall the OS. In the picture on the left you can my external DVD drive plugged in. I put the Eee recovery DVD in and started up the EeePC. It then asks you if you want to reinstall everything or something like that. Just click yes and follow through the steps and this installs everything onto the SSD so it is as the HDD comes out of the box. Once the recovery process if finished your EeePC is fully upgraded and ready to go.
Very exciting and relatively painless process to upgrade the HDD to an SSD if you follow these steps. I think I have covered everything, I'm just writing this off the top of my head but I am pretty sure I have written everything that I did.
I haven't yet done any official accurate timings of speed but the netbook is noticeably quicker - e.g. less than 30 seconds for a full restart (from on to off and to back on again and ready to use). Everything opens pretty much instantly which is great - I'm extremely pleased with it (in case you can't tell!) The other very noticeable thing is that the EeePC with SSD is silent to use unless it gets hot and the fan comes on.
I hope you find this guide helpful to upgrade your EeePC 1005HA. AJ

